Introduction
Here's a helpful list of tips and tricks you can do to better your play. Feel free to add anything you've found to be helpful.
Basic Gameplay Tips
Tactical Digging (Dig buffering)
There are a few enemies that move on every beat, and these can be hard to attack if they're one space away. You can counter this by digging up a wall and letting the enemy close the gap until they're next to you (this does NOT work with the Miner's Cap or the Ring of Phasing).
Killing the Shopkeeper
The shopkeeper can be hurt via bombs, Fireball Spells, red dragons, ogres, or a thrown weapon. If attacked by the player, the shopkeeper will relentlessly chase and attack the player. If attacked by a red dragon or ogre, the shopkeeper will flee from the player, not the red dragon.
It is possible to kill him with only a red dragon, but it is hard to get them both lined up a second time.
Killing the shopkeeper can be near impossible without certain items, as he can move diagonally and deals heavy damage. Before you attack the shopkeeper, consider finding these items:
- Ring of War or a weapon with range (Spear, Bow, etc.). The knockback from the Ring of War will stop the shopkeeper from advancing.
- Any Flail. The range combined with the knockback make this strategy seem risky, but it can save time.
- Glass Longsword, Spear, Bow or Crossbow. Even though you can't knock the shopkeeper back, these ranged weapons will kill the shopkeeper after two hits.
- If all else fails, placing two bombs in quick succession will reduce him to one health if both hit, making it easy to finish him off even with nothing but a dagger. Note, this will not yield a Crown of Greed if you do 5 or more damage, as the order will put the bomb last, blowing the Crown of Greed up as the Shopkeeper dies.
Once you place a bomb or use a fireball, get the shopkeeper parallel to you. Using the items above, it should then be easy to kill him for the Crown of Greed.
An alternate strategy is to aggravate the shopkeeper with a bomb or fireball, and then use an Ice Spell to freeze him or Shield spell to protect yourself, either of which will give you enough beats of safety from his attacks to kill him.
Several of these tactics can be practiced in the Codex room of the Lobby, in the subsection titled "How to Get Away With Murder".
Spotting a Red Eyed Shopkeeper
If the shopkeeper is going to turn on you unprovoked you can get an early heads up by noting the bricks surrounding the shop, as they are usually gray instead of gold in these cases.
Manipulating the Shopkeeper
If a shopkeeper is lured onto a trapdoor, the shopkeeper will fall through and the shop items will become free on the current level, but shops on the following levels will remain normal. If the shopkeeper is scared outside of the shop, the items will be free.
Outsmarting shrines
If you come across a shrine that will overwrite your items (e.g. Shrine of Peace), try to find a replacement item to be overwritten.
If you picked up a nice weapon to replace your dagger and found a Shrine of Peace you want to use, go pick up your dagger and use the Shrine of Peace. Your weapon will still be waiting for you where you left it to be picked up. Same goes with the Shrine of Darkness, except a few torches can't be dropped and wall torches will still be out.
If you come across a Shrine of No Return and happen to have a dagger or spear, throw it nearby first before using the shrine. Picking it back up again before purposefully stepping into the No Return damage area will allow you to acquire a glass rapier for half a heart if you don't have access to a Shield spell.
Fighting from a Distance
Weapons such as Rapiers, Spears, Longswords, and Bows may be useful for surviving, as they allow you to attack from a distance and gives you some room to breathe between enemies.
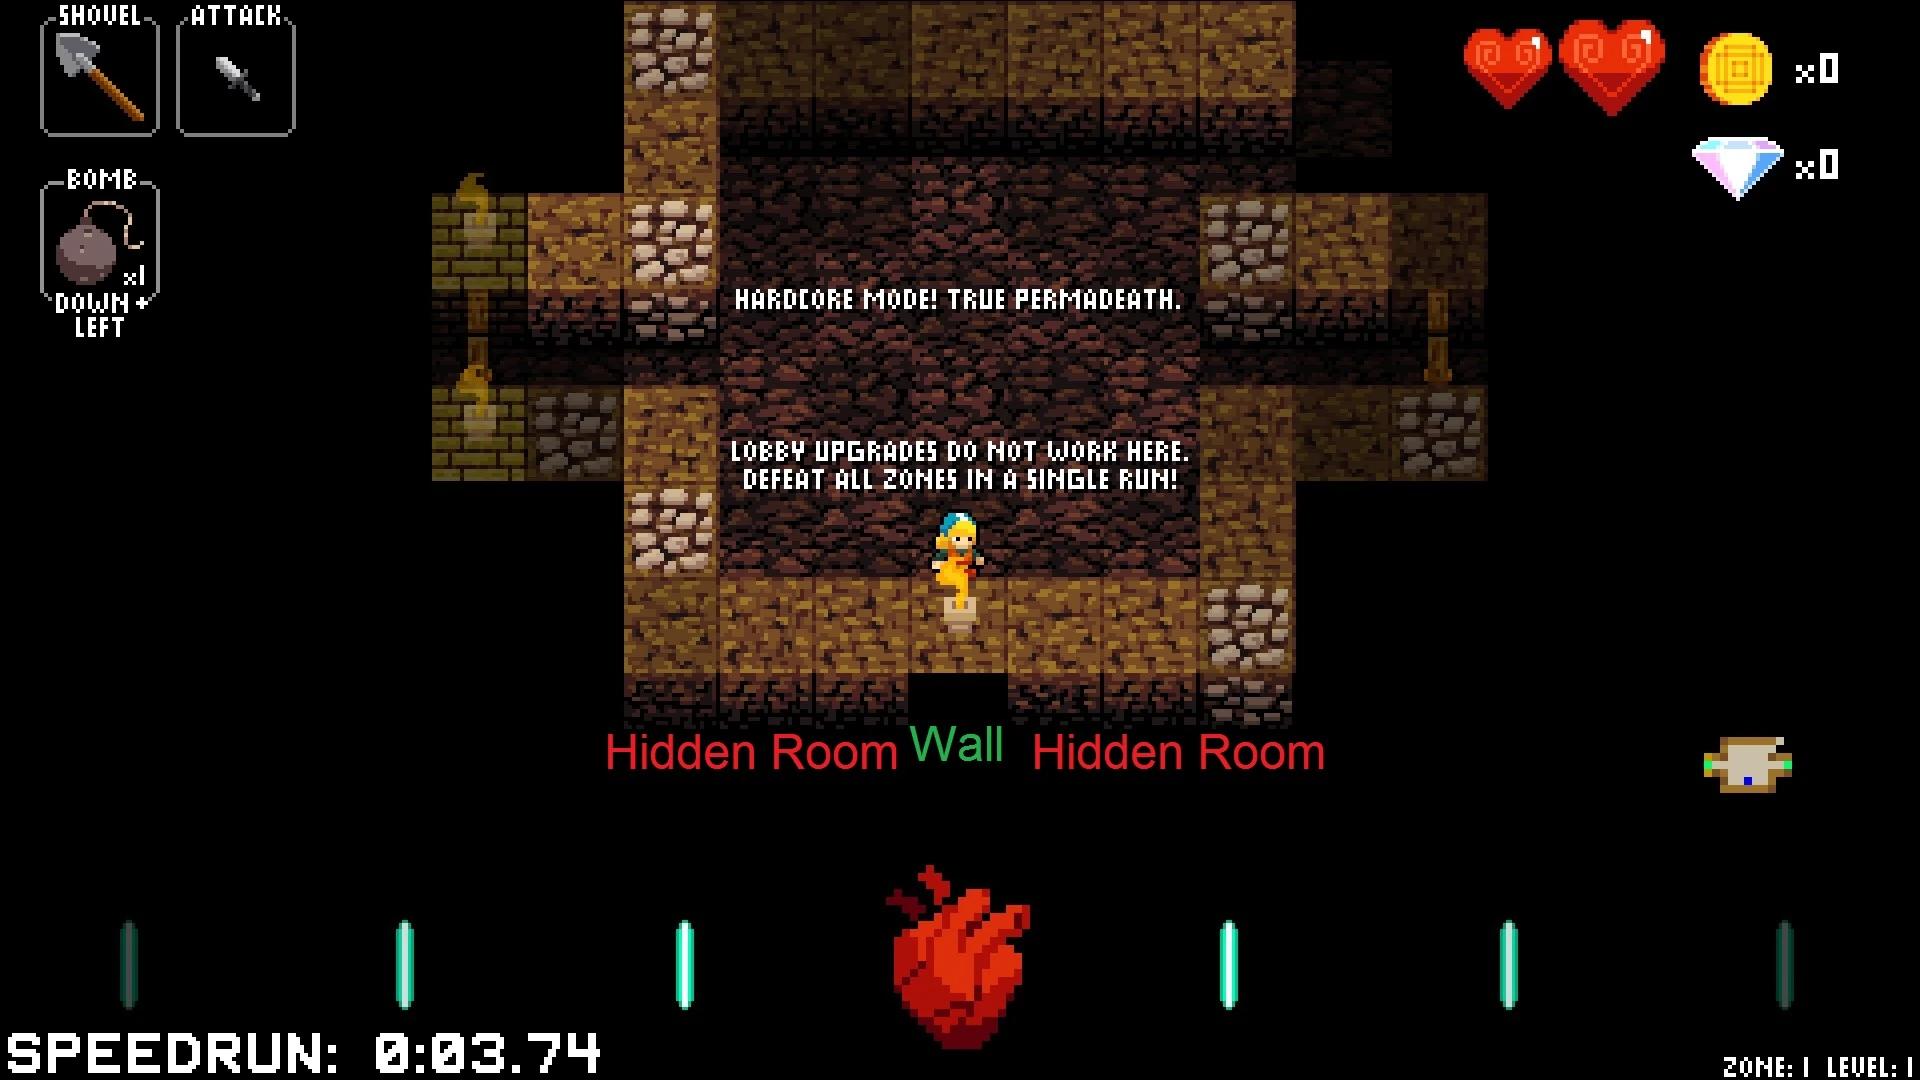
Hidden Rooms
Hidden rooms are always within the level border - never on the outskirts of the level - and are usually found in the larger chunks of walls.
If you see a complete square of stone or catacomb wall, there will typically be a potion in there. Rarely, catacomb walls will be filled with tough enemies surrounding a high-ranked item.
Some rooms have a hidden chest which is revealed when being adjacent to it. Hidden chests can appear in rooms that are seemingly empty or are filled with enemies with the number one less than the size of the hidden room. Hidden chests appear orange (like any other chest) on the mini map, even if they are invisible. If you find an empty hidden room, check your map before moving on.
The top of a hidden room should appear as full wall tiles if next to an open area. It should look like this:
Character Specific Tips
Cadence
Because Cadence is the default character, most of the tips have been discussed above.
Aria
Aria is arguably the most difficult character, since missing a beat or getting hit by anything will kill you.
Playing as Aria will remove all weapons from the item pool, and attempting to use the Shrine of Blood to gain an alternate weapon will kill her for "cowardice". The Shrine of Glass will affect Aria's armor, shovel, headwear, and torch, but not her dagger; the Shrine of Peace gives Aria a Potion if she doesn't have one, however, it doesn't appear in Aria runs.
Any tempo-down traps can be bombed to provide a slower, easier to follow beat for the rest of the level.
These items can help make runs as Aria easier:
- Glass armor is one of the few means of protection that Aria has, as this will absorb all damage. Any other armor types are effectively useless. Any effects that trigger instead of taking damage when hit (the Crown of Teleportation, Charm of Frost, and the Ring of Shielding) are extremely valuable.
- Effects that normally make the player more fragile are also valuable, because Aria is already fragile to begin with. These include the Karate Gi and Glass Jaw, which are two of the few ways for her to increase her damage, and the Ring of Becoming, which can be turned into the powerful Ring of Wonder.
- Many rings are strong for Aria.
- The Ring of War will knock enemies back and provide more attack power.
- Since the Ring of Courage protects from attacks when an enemy is killed, it can be very useful for crowd control.
- For a simple damage boost, the Ring of Might is also a good choice.
- Ring of Peace doesn't give extra health, but the reduced number of enemies and easier minibosses can be a big help.
- Ring of Mana allows very frequent use of Fireball, Freeze, and Shield, which can make fights much easier.
- Boots of Strength can be used for a damage boost, while Lead Boots, Explorer's Boots, and Winged Boots can give various forms of defense.
- Any kind of food or Holy Water will give Aria invincibility for one beat, making these somewhat useful around enemies. Using a bomb while wearing Blast Helm will also give invincibility for one beat, along with the added bonus of doing four damage to surrounding tiles.
- The single most valuable item is the Potion, because it will revive you even if you miss a beat. However, if it revives you after you take damage from a monster, then any glass items you had will still break from the hit. The Green Scroll will always give a second potion, as long as you have any shovel equipped and don't use it while adjacent to multiple enemies (remember you can only carry one potion at a time, so save the scroll if you have one already).
Bolt
When playing as Bolt, the beat moves twice as quickly, making everything in the game move twice as fast. This makes movement much more difficult because it becomes much harder to successfully hit every beat in time, while also severely decreasing the amount of time you have to react to enemies and other hazards.
If you are used to dropping every eighth beat from the Shrine of Rhythm, the extra beat will effectively slow down the action and give you a little more time to react.
One way to make the beats less frequent and more manageable is to set the songs of each stage to custom music that plays at a slower tempo, or by using custom music with the "1/2 Speed" option selected. This changes the beat to the same slow speed used by the other characters, rather than simply cancelling out Bolt's trait, making it play at normal speed. Play around with music to find songs that gives a reasonable beat with "1/2 Speed" on, without being too slow.
However, not checking "1/2 Speed" or checking "2x Speed" causes the beat to play at Bolt's normal 2x speed. This strategy also does not work with the game's default soundtrack.
Dove
Dove's pacifism may prove to be a problem as she can be surrounded by enemies with no escape. Also, Dove will die when the song ends, so the player cannot wait the song out. Fortunately, Dove has the best shovel in the game. Use this to your advantage by digging around walls. Everything is a threat, so it is highly recommended to get:
- The War Drum to lure Wraiths, Ghouls, and so on.
- The Blast Helmet, which makes bombs go off instantaneously and therefore makes it easier to get out of a tight spot. Alternatively, the Miner's Cap, so the player can automatically dig while fleeing.
- Circlet of Telepathy you can see enemies in advance without them seeing you. If the player cannot find this item, then the Monocle will also work, as it allows you to see the "ghost" enemies.
The player should take a cautionary note about bombs:
Friendly bombs will only teleport enemies away but being in contact of an explosion will still harm Dove (without the Blast Helm). Bombs from Goblin Bombers and Bomb Traps will still kill enemies, though. Also take note that worshiping at a Shrine of Blood will kill her for Cowardice.
Bard
Bard can move at any point in time. Use this to plan moves ahead or pause for a moment to analyze your surroundings. You are also not forced to finish a level by the end of the song. The track will keep repeating, so take all the time you need. This may be a problem, however. If the player is cornered by enemies they cannot defeat with their weapon, or boxed in by walls or traps, then they are essentially trapped forever.
Monk
- Monk's starting Blood Shovel can dig out any wall, which may be necessary to get around gold blocking your path. Finding another shovel early on will be helpful to avoid the Blood Shovel's health cost.
- Mushrooms and cauldrons drop some coins when playing as Monk.
- Bombs can be used to destroy coins and clear a path in case you trap yourself. Similarly, you can use two bombs to enter sealed shops; one to destroy the gold wall and one to destroy the money that the walls drop.
- Sealed shops can also be opened with the use of the Blood Shovel to destroy the gold wall and one bomb to destroy the money the walls drop. Useful for conserving bombs at the cost of some health.
- Secret shops can be very beneficial to the Monk. While you'll still pay health at the Blood Shop, other hidden shops will give you an item for free just like the standard shopkeeper will.
- Be careful around enemies that can move you around, especially the Skeleton Mages in Zone 2.
- If you are unable to progress (such as if gold drops on the stairs, or you simply become trapped), just wait the rest of the song out and you'll be dropped down to the next level. It may force you into an arena, but it's better than dying instantly.
- Despite the damage bonus of gold weapons being inaccessible to Monk, they are still valuable for score runs.
Eli
- When doing a score run, care must be taken to not destroy the gold with bombs.
- Golden walls won't yield coins when destroyed.
 Nocturna
- Nocturna's transform spell can be really handy if you happen to be low on health, and are good at using a dagger. Nocturna's fangs in bat form have the range of a basic dagger, heal you for 0.5 hearts every 5 kills and do 4 damage. Simply transform, kill enemies until you have full health again, and then transform back.
Boss Tips
Deep Blues
Upon entering the chessboard, proceed to kill the closest pieces, usually being a few Pawns followed by Knights, Rooks, and Bishops, all the while keeping an eye on the Queen and the Knights to avoid damage. Generally, proceeding from the left will get rid of most of the high-tier pieces very quickly while minimizing damage taken. Note that each unit will tilt itself on the beat before it is going to move. When fighting the King, as he approaches you, side step to draw him closer, as he can move diagonally. You can, however, still kill the King without advancing on the other pieces first, as when the King still has company, he'll only move once every other beat. Keep in mind though: hitting the King without killing him when there are still other pieces on the board will teleport him away from you.
Pawns that reach the bottom of the room will become Queens. It's a good idea to quickly get rid of the Pawns closest to you, especially on Zones 3 and 4, where red Pawns promote to red Queens. Using a Scroll of Fear with with Pawns behind you will cause them to move every beat, making them all turn into Queens very quickly.
With a high enough damage spear or dagger, you can throw it right at the start of the fight and instantly kill the King, allowing for a much faster boss clear. The same goes for piercing weapons (i.e. Rifle).
View the full Deep Blues page to see how each piece moves.
King Conga
Go to the middle of the arena, between the zombies and kill them one by one, alternating left and right. Keep an eye out for the missing 8th beat so you don't miss it. Alternately, King Conga can be taken on immediately if you destroy his throne with a bomb or tier 3 shovel.
If you previously worshiped at a Shrine of War, bats will spawn as their red variety, all armadillos will be yellow and all mages and Liches will be black.
This boss can be considered training for the Shrine of Rhythm.
Death Metal
If you have a blood weapon equipped, you can continuously hit Death Metal's shield to spawn more enemies and regenerate your health. You can also do this in his second and third phase (when he spawns skeletons), but it can get out of control quickly. The player should take caution though; dealing with bats at such a high tempo can prove to be difficult.
If you are being overwhelmed by yellow or black skeletons in the later phases, consider hitting them down to 1 heart and letting them flee. Since there is a cap on the number of skeletons in the arena at once, Death Metal will eventually become harmless. When enough are running into the walls, you can engage Death Metal relatively safely.
Phasing and piercing weapons (e.g. Dagger of Phasing, Crossbow) can hit Death Metal through his shield.
Coral Riff
At first, the tentacles will come after you two or four at a time depending on their health in later Zones. Each will either die or teleport away upon being hit, so they can all be taken out will relative ease, even if equipped with a dagger. If you happen to miss any of them, you will get a second chance before the second phase automatically starts.
At the second phase, any undefeated tentacles along with the boss's body will now come slowly towards you. The most important thing to realize (mostly if equipped with a dagger, broadsword or flail) is that whenever the torso moves forward, it will attack all squares around it on the tile it moves to. Stay off to the side, then move in and attack it once both of you are in the same row. Make sure that if you are two spaces away from the Octoboss that it is not shaking, as this signals that it will move and attack on the next beat. For the tentacles, they can only attack the squares adjacent to them and cannot move while attacking. It's best to take care of them first, so they won't be a distraction.
Without the Explorer's Boots, Boots of Leaping, or the Winged Boots, the pools of water left by tentacles can be a serious hindrance, especially in phase 1 since there are 4 beats in-between the tentacles' appearances. It may be useful to deliberately enter and exit one puddle to make more room, there should be just enough time left over after attacking both enemies if they spawn within reach in order to do this. The same thing applies after attacking one if they spawn diagonally and you're equipped with only a dagger.
High score tips
Crown of Greed
This item is designed for gold-score runs, due to the fact it doubles gold and removes the primary usage of gold. (the main shopkeeper) It also doubles the gold dropped by enemies. The double gold will nullify the downsides of the crown.
- To maximize the benefits of the crown, optimizing routes and combats is essential. An average song lasts over 300 beats which means that bonus gold can be retained by using the moves wisely.
- When wearing Crown of Greed and entering another level where another headgear is available from the start, it may be recommended to switch headgear, slay enemies, pick up crown of greed and then pick up gold in order to maximize the score.
- Boots of Leaping and Boots of Lunging can save you a lot of gold while crossing long distances.
- Consider how much gold it will take you to go collect another pile of gold. If a pile of 3 gold is 6 tiles away, it will take 12 moves to collect it and go back to where you were, meaning you'd be at a loss.
- Only start collecting gold if you can keep your count above 0, any gold collected when your gold reaches 0 is wasted time and money.
Golden weapons
- While golden weapons only do the same damage as basic weapons, the increased amount of gold obtained compensates your effort, even with Crown of Greed. In addition, they also deal an infinite amount of damage the beat after you collect gold.
- Golden weapons can consistently be found in blood shops.
- Obtaining a holster can be useful if you find a golden weapon along with a powerful one, allowing you to deal heavy damage to high-health enemies and finishing them off with the golden weapon. However, this maneuver may be difficult to pull off.
Ring of Gold vs Ring of War
Ring of Gold causes each slain enemy to drop one additional coin before the coin multiplier and draws all gold on the level to you. However, the additional enemies spawned in each level by Ring of War arguably produces more additional gold. The Ring of War also provides +1 weapon damage and knockback; however, especially in Zone 3, it is easy to get overrun by the extra enemies. Overall Ring of War is a high-risk, high-reward option. However, the value of Ring of Gold rises with Crown of Greed as less moves are needed to pick up all the gold, especially when blowing up golden walls.
Ring of Gold becomes more valuable in Zone 4 as it allows to safely pick up gold left by the Goblin Bombers.
For Eli, Ring of Gold is better, especially when having Crown of Greed as this means it saves moves when picking up the gold and lowers the risk of accidentally destroying it.
Golden Walls
- If you have spare bombs or a bomb spell, you can blow up the shop walls for 10 gold for each tile. You could also use a Scroll of Gigantism and a pickaxe (after 4 hits), Glass Shovel or Obsidian Shovel (with maximum Groove Chain) to dig up the walls. The Blood Shovel can always dig golden walls and can dig multiple at a time.
- Use bombs or the Blood Shovel in corners for maximum gold.
- Prioritize the Bomb Spell over consumable bombs as the spell regenerates.
- When using a Bomb Spell or Blood Shovel on walls, it is useful to have food and/or Ring of Regeneration. This allows more frequent usage of Blood Magic.
- Generally it is best to save bombs into Zone 3 or 4 unless you have plenty of them. Since they can be useful for revealing Travel Runes which lead to useful shops, save them for the later levels when it is unlikely that you need any more gear.
- In Zone 2, there are mushrooms at inner corners of shops. There is a chance that mushrooms are explosive and can blow up the walls for you.
- Travel Rune rooms are also surrounded by golden walls. Some Travel Rune rooms are smaller than shops so less moves are spent blowing up the wall corners, while some are bigger than shops, which so more walls can be destroyed with a Scroll of Gigantism.
Shrine of War
The Shrine of War will allow you to gain a lot more gold as the hardest enemy variations will spawn.
- Make sure you have a good weapon to deal with the stronger enemies.
- Golden weapons with Shrine of War ensure a very high score if you are careful and skilled.
Higher Groove Chain
This page will help you with getting a bigger Groove Chain
Arenas
A properly skilled player should always go to arena rooms found behind a cracked dirt wall. They usually offer a decent item to pick up, but be sure you are prepared to fight the enemies inside.
Leprechaun
Hitting and running away from the Leprechaun can yield several hundred gold on its own, but be extra careful that it doesn't hit you back, as it will disappear and take all of your current gold. An easy way to get one to spawn is to kill a Red or Blue Dragon at max multiplier.
Speed Run Tips
Weapons that Move You
- The key to getting a good time is to keep moving. By using the Cat o' Nine Tails, the Rapier or the Axe, you are able to move as you attack.
- The Ring of Courage will also move you as you kill enemies.
- Weapons such as the Crossbow and Blunderbuss aren't ideal as they require constant reloading, which impedes your progress, but they can kill armored enemies much faster, which is particularly useful in later zones.
Skipping Levels
- If you're trying for a very fast speed run, trapdoors are the way to go. As long as you can defeat or escape the miniboss penalty box, this should cut minutes off your time.
- Look for hidden trap rooms within the walls, as this is usually the easiest way to find trapdoors early on.
- The Torch of Foresight is the best torch for speed runs for this reason, although any torch will be valuable.
Optimize your Movement
Try and get the most out of each move: each move counts.
- Use bounce pads to streamline your movement.
- Using tempo up traps allow you to clear more distance in less time.
- The Boots of Leaping and Boots of Lunging can help you clear levels faster.
- The Heart Transplant temporarily makes movement like the Bard's. You can move incredibly fast as long as it's in effect.
- Sometimes it may be better to let the enemies follow you instead of going after them right away. Recommended for places where you have to make a return trip such as shops.
- A map or compass allow you to always go directly to the exit, without wasting time searching for it.
- Consider how many moves it will take to walk around an area, or dig through it.
Speed, not Score
In a speed run, you're ranked on how fast you complete the game, not your end score.
- Don't bother picking up gold that isn't where you're going.
- Avoid as many enemies as you can, unless they're in the way.
- Your target priority should be the miniboss. Kill them then get to the exit.
- Rings are huge for speed. The top rings are courage and peace. Courage lets you move through enemies, ignoring most of them, and peace gives you less enemies, so you spend less time killing them. Other strong rings are might, war, pain, mana, and regen
- Tempo traps will not change the timer on the bottom left, so use this to your advantage
- You can also destroy tempo traps with a bomb after activation to make the tempo change last for the entire level.
- Avoid the Shine of Rhythm, it will slow you down immensely due to having to wait every 8th beat.
Miscellaneous
- The speedrun timer is paused while the boss image is displayed. This only works if "Show Boss Intros" is checked in Gameplay Options; without the image, the monsters won't move until you do, but the speedrun timer won't pause.